Basic properties of images and pixels
Learning Objectives
After completing this lesson, learners should be able to:
Understand that an image is composed of pixels.
Understand what pixels and voxels are.
Examine the values and indices of pixels in an image.
Motivation
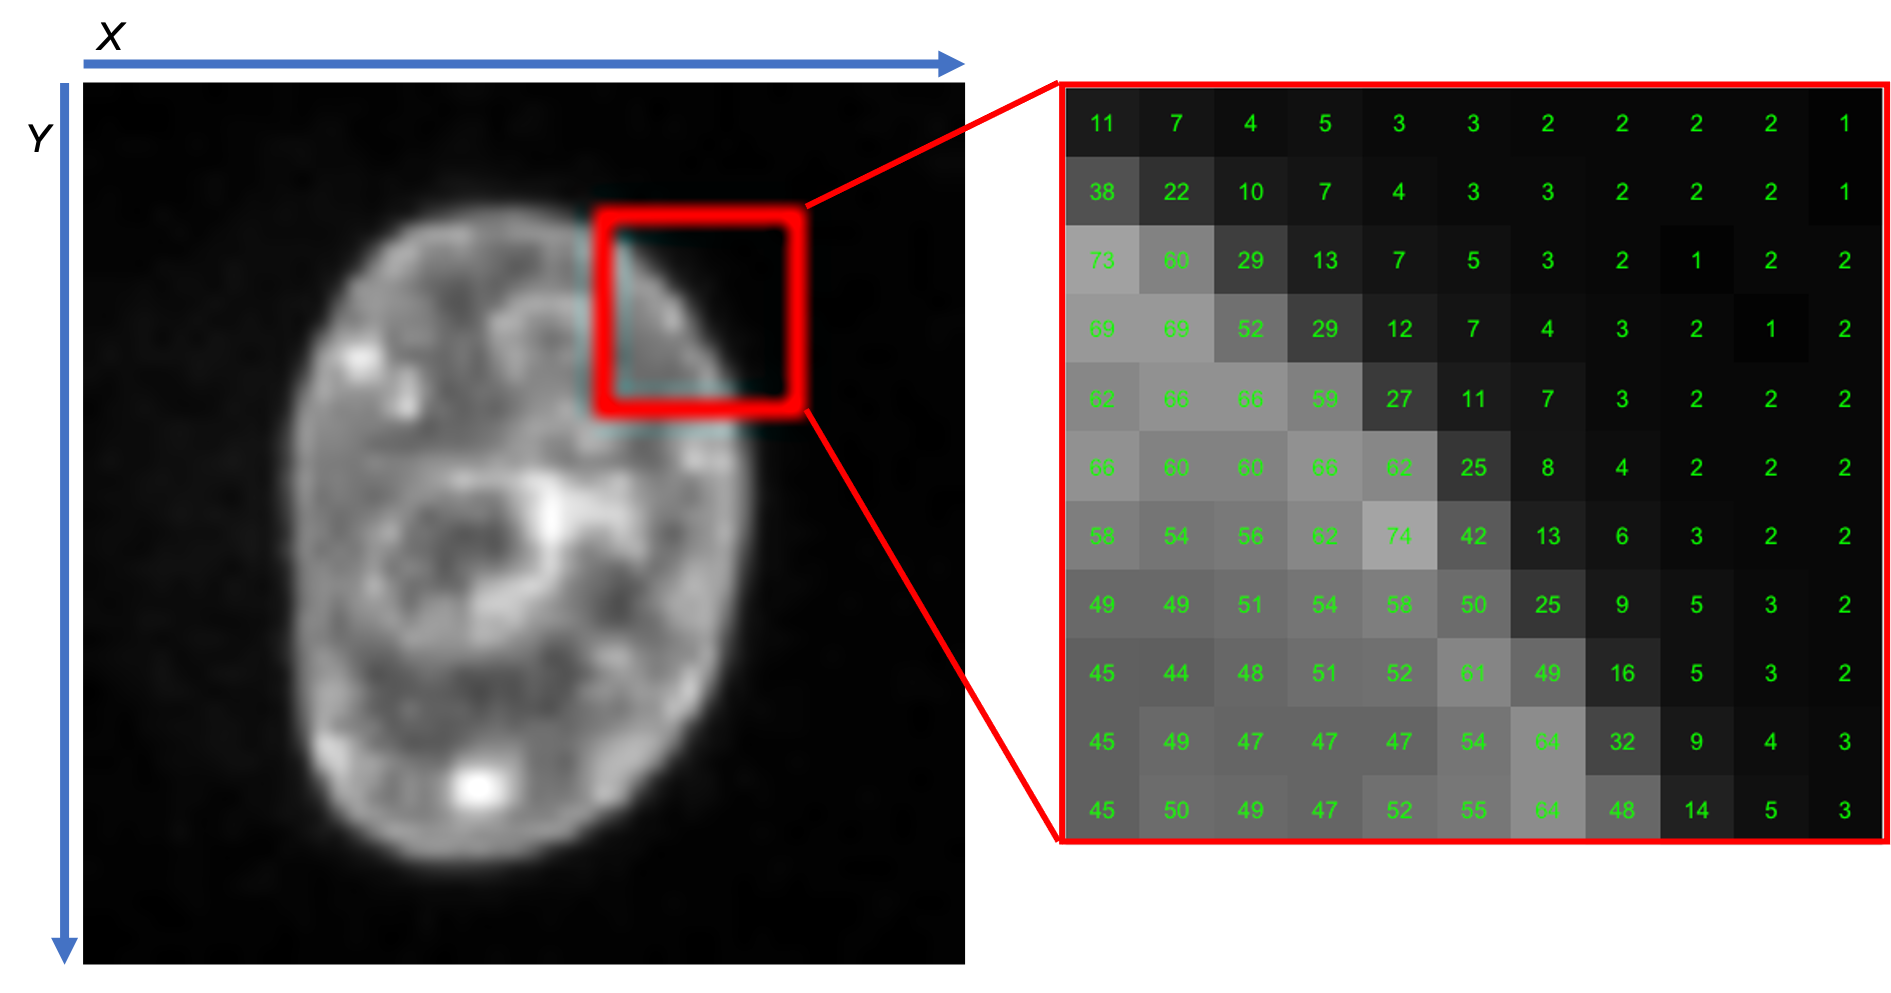
Although the technical definition an image is more general, in practice images are very often represented as an array of pixels (voxels). Pixel stands for “picture element”. In 3-D, a pixel is sometimes also called a voxel, which stands for “volume element”. For image analysis it is crucial to know how to examine the pixels (voxels) in an image.
Concept map
graph TD
Im("Image") -->|has many| P("Pixel/Voxel")
P -->|has| Va("Value")
P -->|has| I("Indices")
Example figure

Activity
- Open image: xy_8bit__nuclei_noisy_different_intensity.tif
- Explore different ways to inspect pixel values and indices, e.g.,
- Examine individual (or a range of) pixel values
- Plot line profiles
- Compute and plot pixel value histograms
ImageJ GUI
Explore pixel values and indices
- Open image: xy_8bit__nuclei_noisy_different_intensity.tif
- Explore different ways to inspect pixel values and indices
- Mouse hover
- Line profile. Draw a line and [Analyze > Plot Profile] or [Ctrl + K].
- Histogram [Analyze > Histogram] or [Ctrl + H]
- Check where the lowest pixel indices are in the displayed image:
- Most commonly: Upper left corner, which is different to conventional coordinate systems.
MATLAB
% This MATLAB script illustrates how to explore different ways
% to inspect pixel values and indices
% It is recommended to read comments and to run sections separately
% one after the other with the corresponding command in the Editor Toolstrip

%% Choose and load the image %%
% Read input image
in_image = webread('https://github.com/NEUBIAS/training-resources/raw/master/image_data/xy_8bit__nuclei_noisy_different_intensity.tif');
% Display input image
figure
imagesc(in_image)
axis equal

%% 1 - Explore pixels with mouse (Data Tips) %%
% In the Figure window, click the Data Tips symbol
% (text baloon icon on the top right corner of the image)
% or select from [Tools>Data Cursor] in the Figure Toolstrip

% Now if you click on the image a Data Tip window will appear
% showing the coordinates [X,Y], the pixel intensity [Index]
% and the assigned colour in the current display [R,G,B]

% To exit the Data Tips mode, click again on the Data Tips icon

% To stop displaying Data Tips, right click on the image and select
% [Delete All Data Tips]

% N.B. The point with the lowest coordinates [X,Y = 0,0] is normally found
% on the top left corner

%% 2 - Explore by linescans %%
% Draw a line across the image to evaluate its intensity profile
% 1. Click on the starting point of the line on the image
% 2. Click on the end point of the line on the image
% 3. Press [Enter]
[x_coord, y_coord, line_profile] = improfile;

% Plot sampled line on the image
hold on
plot(x_coord, y_coord, 'w.')

% Create new figure showing the line profile
figure
plot(line_profile, 'k', 'LineWidth', 2)
xlabel('Distance (pixels)')
ylabel('Gray value')
set(findall(gcf, '-property', 'FontSize'), 'FontSize', 14)

%% 3 - Explore by plotting the image histogram %%
% Produce the image histogram
figure
histogram(in_image)
xlabel('Gray value')
ylabel('Counts')
set(findall(gcf, '-property', 'FontSize'), 'FontSize', 14)

% Calculate some metrics from the histogram
% Number of pixels included in the count:
px_count = size(in_image,1)*size(in_image,2);
% Mean gray value
px_mean = nanmean(in_image(:));
% Standard deviation for gray values
px_std = nanstd(double(in_image(:)));
% Minimum gray value
px_min = nanmin(in_image(:));
% Maximum gray value
px_max = nanmax(in_image(:));
% Mode for gray values
[px_mode, px_mode_frequency] = mode(in_image(:));

% Print metrics to screen
fprintf('Count = %i\n', px_count);
fprintf('Mean = %.3f\n', px_mean);
fprintf('StdDev = %.3f\n', px_std);
fprintf('Min = %i\n', px_min);
fprintf('Max = %i\n', px_max);
fprintf('Mode = %i (%i)\n', px_mode, px_mode_frequency);
Assessment
2D image inspection
Open image xy_8bit__nuclei_noisy_different_intensity.tif. Hint: For certain exercises the inspection of the histogram will help
- What is the value of the pixel at the indices (x=20,y=20)?
- What is the highest value in the image?
- What is the most frequently occurring value in the image?
- Where is this pixel with the indices (x=0,y=0)? Why is this potentially confusing?
- How many pixels does this image have in the x direction?
- What is the highest pixel index in the x direction?
- If you were to rotate the image by 90 degrees, would it change the image histogram?
Solution
- 82
- 129
- 55
- Top left; normally x/y coordinate systems have their origin at the bottom left
- 59
- 58
- No, the gray value histogram is independent of the pixel locations
3D image inspection
Open image: xyz_8bit__mri_head.tif
- What is the value of the voxel at the indices (x=93,y=124,z=13)?
- Which is the highest value in the image?
Solution
- 47
- 255
Follow-up material
We recommend reading these modules next:
Learn more: