Median filter
Prerequisites
Before starting this lesson, you should be familiar with:
Learning Objectives
After completing this lesson, learners should be able to:
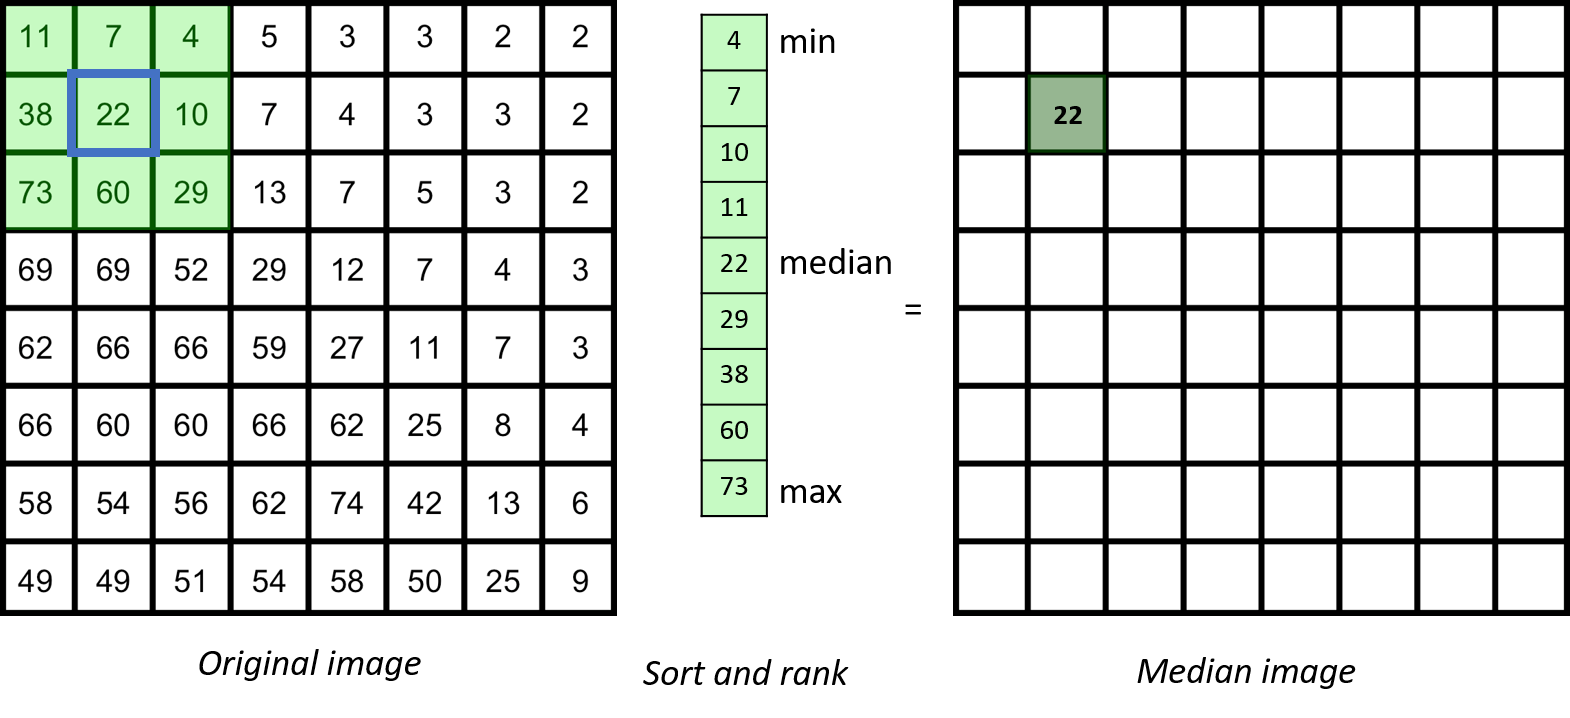
Understand in detail what happens when applying a median filter to an image
Motivation
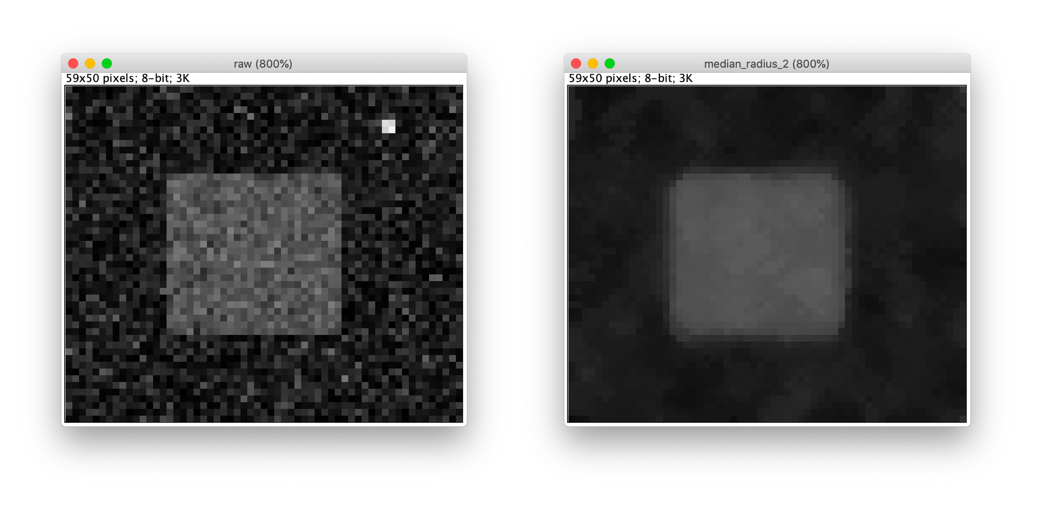
The median filter is a rank filter and is one of the most popular filters for reducing noise in microscopy images. While the median filter has indeed many good properties, it should be - like any other filter - used with care and a good understanding of its properties.
Concept map
Example figure

Properties of median filter
The median filter is based on ranking the pixels in the neighbourhood

In general, for any neighbourhood filter, if the spatial extend of the neighbourhood is significantly (maybe three-fold) smaller than the smallest spatial length scale that you care about, you are on the safe side.
However, in biology, microscopy images are often containing relevant information down to the level of a single pixel. Thus, you typically have to deal with the fact that filtering may alter your image in a significant way. To judge whether this may affect your scientific conclusions you therefore should study the effect of filters in some detail.
Although a median filter typically is applied to a noisy gray-scale image, understanding its properties is easier when looking at a binary image.
From inspecting the effect of the median filter on above test image, one could say that a median filter
- is edge preserving
- cuts off at convex regions
- fills in at concave regions
- completely removes structures whose shortest axis is smaller than the filter width
Activity
Use example images that are relevant to your science and explore in detail what happens when applying a median filter. On purpose, increase the neighbourhood to an extend where your structures of interest become clearly compromised. Do some of all of these activities.
-
Open image xy_8bit_binary__squares_different_size.tif discuss effect of median filter on removing small objects, preserving edge and changing edges for large radii.
-
Open image xy_8bit_binary__large_spot.tif discuss effect of median filter on edge changes. Use a ROI and apply filter only on the ROI. Compare also to mean filter.
- Open image xy_8bit__two_noisy_squares_different_size.tif and discuss effect of median and mean filter of different size with respect to noise and preservation of structure.
-
Open image xy_8bit__PCNA.tif and discuss effect of filters with respect to preservation of structure.
- (Optional) Open image xy_8bit_binary__test_structures.tif and discuss what happens to the structures. This is a more detail inspection of what does a median filter do.
ImageJ GUI & Macro median
run("Close All");

//File > Open...
open("https://github.com/NEUBIAS/training-resources/raw/master/image_data/xy_8bit__two_noisy_squares_different_size.tif");
// Image > Duplicate...
run("Duplicate...", "title=Median_1");
// Image > Duplicate...
run("Duplicate...", "title=Median_2");
// Image > Duplicate...
run("Duplicate...", "title=Median_5");

selectWindow("Median_1");
// Process › Filters › Median...
run("Median...", "radius=1");

selectWindow("Median_2");
// Process › Filters › Median...
run("Median...", "radius=2");

selectWindow("Median_5");
// Process › Filters › Median...
run("Median...", "radius=5");
run("Tile")
ImageJ GUI & Macro mean
run("Close All");

//File > Open...
open("https://github.com/NEUBIAS/training-resources/raw/master/image_data/xy_8bit__two_noisy_squares_different_size.tif");
// Image > Duplicate...
run("Duplicate...", "title=Mean_1");
// Image > Duplicate...
run("Duplicate...", "title=Mean_2");
// Image > Duplicate...
run("Duplicate...", "title=Mean_5");

selectWindow("Median_1");
// Process › Filters › Mean...
run("Mean...", "radius=1");

selectWindow("Mean_2");
// Process › Filters › Mean...
run("Mean...", "radius=2");

selectWindow("Mean_5");
// Process › Filters › Mean...
run("Mean...", "radius=5");
run("Tile")
Exercises
Show exercises for:ImageJ GUI
Exercise 1
- Open xy_16bit__microtubules.tif
- Apply median filter with radius 1 and 3, respectively
- Estimate the width of microtubules for non-filtered and filtered images using line profile, [Analyze > Plot Profile]
- What happens if you median filter with radius above 10?
- What happens to the microtubule width if you mean filter with radius 3
Solution
- [File > Open …] xy_16bit__microtubules.tif
- [Image > Duplicate] name small_median
- [Image > Duplicate] name large_median
- on small_median [Process > Filters > Median] radius 1
- on large_median [Process > Filters > Median] radius 3
- Draw a line with a line tool orthogonal to the MTs
- Measure line width using [Analyze > Plot Profile] or [Ctrl-K]
- Estimate width or in profile window [Data» > Add fit…] and [Fit function > Gaussian] the parameter d
is a proxy for the width (d = sigma).- For radii larger than 10 the microtubules disappear
- A mean filter with radius 3 will increase the apparent width (blur) the microtubules
Exercise 2
- Open xy_8bit__nuclei_noisy_different_intensity.tif
- Estimate radius of nuclei
- Apply median filter smaller than nucleus radius
- Apply median filter larger than nucleus radius
- Which radius can be use to
- suppress noise
- remove dark spot in one of the nuclei
- remove both nuclei
- Compare median filter to mean filter of same radii
- What are the advantages of a median filter?
- What are the advantages of a mean filter?
Solution
- [File > Open …] xy_8bit__nuclei_noisy_different_intensity.tif
- Draw a line with a line along one of the nuclei and measure radius. About 7 px
- Apply median filter smaller than nucleus radius. noise is suppressed
- Apply median filter larger than nucleus radius: nuclei are shrinking
- Which radius can be use to
- suppress noise 2
- remove dark spot in one of the nuclei 1
- remove both nuclei 20
- Compare median filter to mean filter of same radii
- What are the advantages of a median filter? edge preserving
- What are the advantages of a mean filter? small structure preserving
Assessment
True or false?
- Median filter is just another name for mean filter.
- Small structures can completely disappear from an image when applying a median filter.
Solution
- Median filter is just another name for mean filter. FALSE
- Small structures can completely disappear from an image when applying a median filter. TRUE
Follow-up material
We recommend reading these modules next:
Learn more: